Setting up a new 44Net-Connect VPN tunnel is required before following this guide.
This next section is completely optional and requires a few things. First, we’re going to create a dedicated 44Net network and a new LXC in Proxmox. Next, we’re going to configure the LXC as a Linux router, just like your home or business router hardware. This will allow multiple devices on your network to access 44.x.x.x IP addresses with only a single VPN tunnel, and to talk back and forth with each other AND your home network without having to go back out over the VPN tunnel to do so.
This guide assumes the following:
- Basic networking experience
- Basic modern Linux OS experience
- Proxmox 9 or higher installed
- Knowledge of how to make containers and networks in Proxmox
- A downloaded LXC template for Debian 13 or Ubuntu 24.04 or newer
- A free and available NIC if you want to use your new network on physical computers outside of VMs and containers
Request a 44Net subnet in 44Net Connect and apply it to the tunnel
Under MY RESOURCES > Networks, select Request Network Allocation.
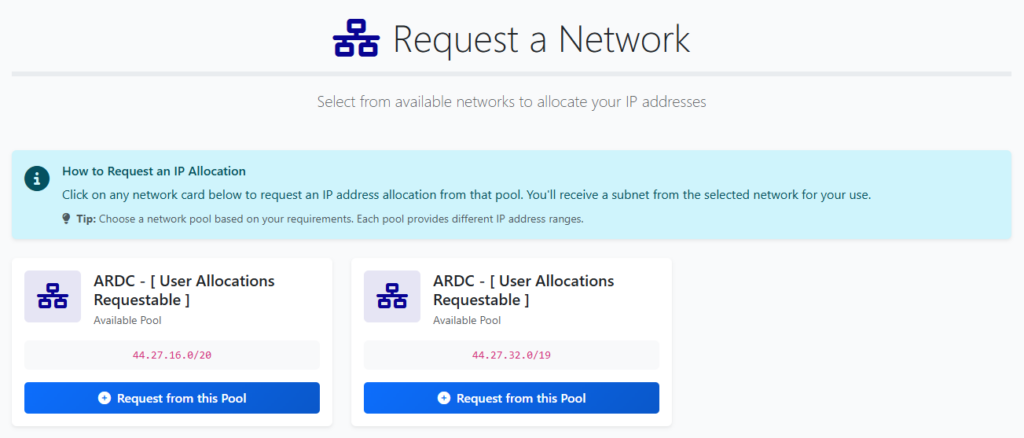
Select a pool to request a a subnet from.
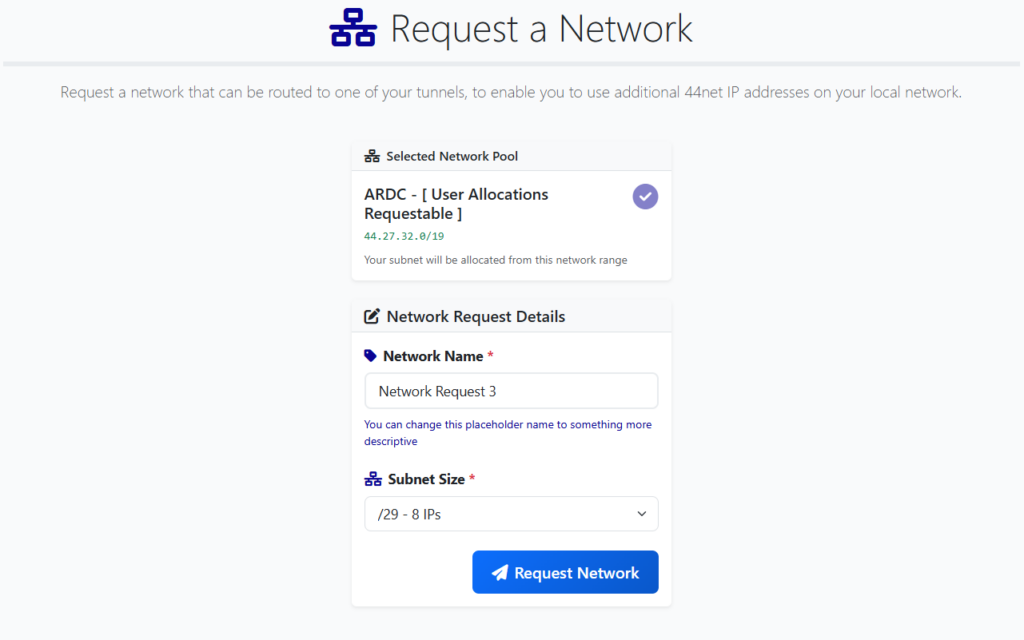
Name your network and select an appropriate subnet size. A /29 network is often a reasonable starting point for experimentation. This will give you a total of 5 usable 44.x.x.x IPs for your projects. Don’t forget that if you grow beyond that allocation, you can request more later. No need to unnecessarily tie up resources.
It may take a while to get this new allocation approved. Periodically check back to see if it’s been approved under “My Requests”.
Back under MY RESOURCES > Tunnels, edit your previously created tunnel, or make a new one.
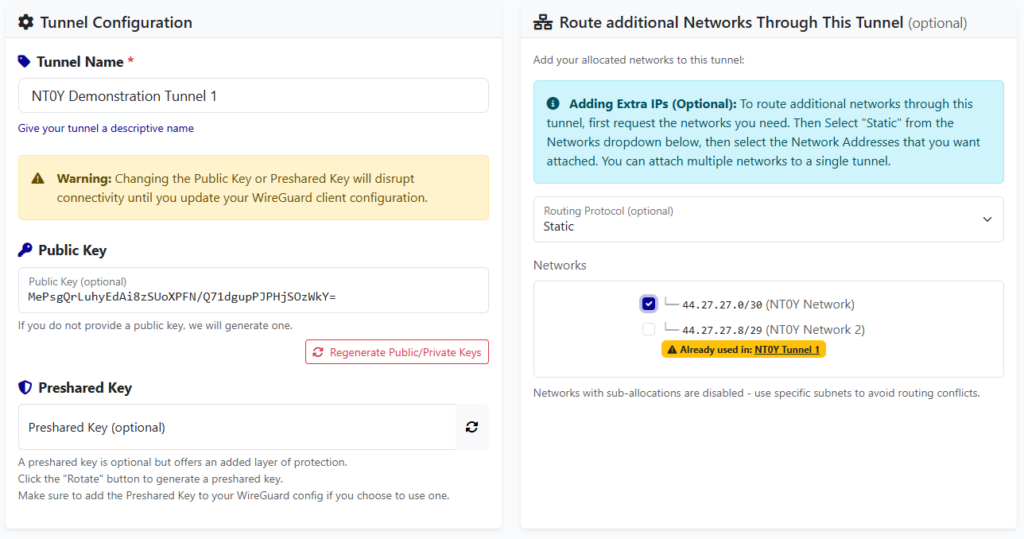
Under “Route additional Networks Through This Tunnel”, select “Static” for the Routing Protocol, then place a checkbox next to the network allocation you wish to use within this tunnel. Save it.
Configure a new Proxmox Network for 44Net
Select your PVE node root, then System > Network. Create a new Linux Bridge.
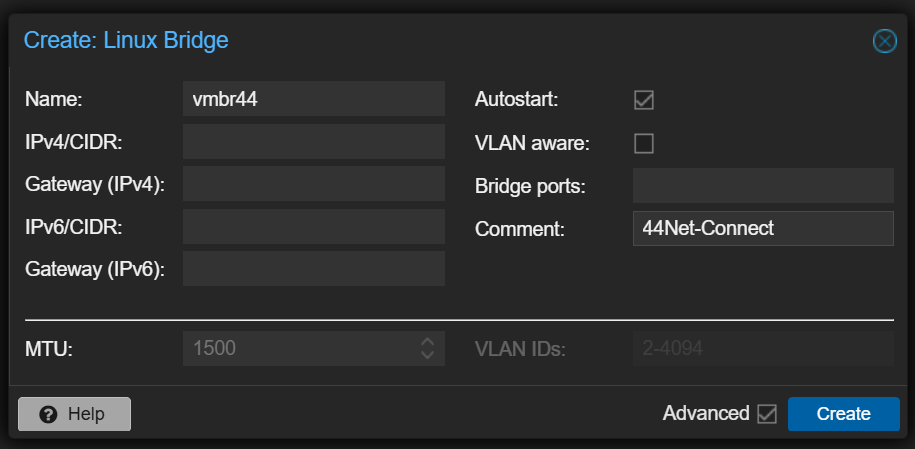
I named it vmbr44 (virtual machine bridge number 44) to remind me of what network it’s connecting to. Place a comment to do the same. Lastly, if you plan on using this network in the physical world, select your UNUSED network card in “Bridge ports:”. If you only plan on using this with other virtual machines and containers in Proxmox, omit this. Change the MTU under Advanced to 1300. You’ll certainly need this later since the tunnel has an MTU of 1380. Create.
Create a new Proxmox LXC to make a 44Net router
Create a new LXC which we’ll configure as a router. Choose a suitable name, and enter a new password.
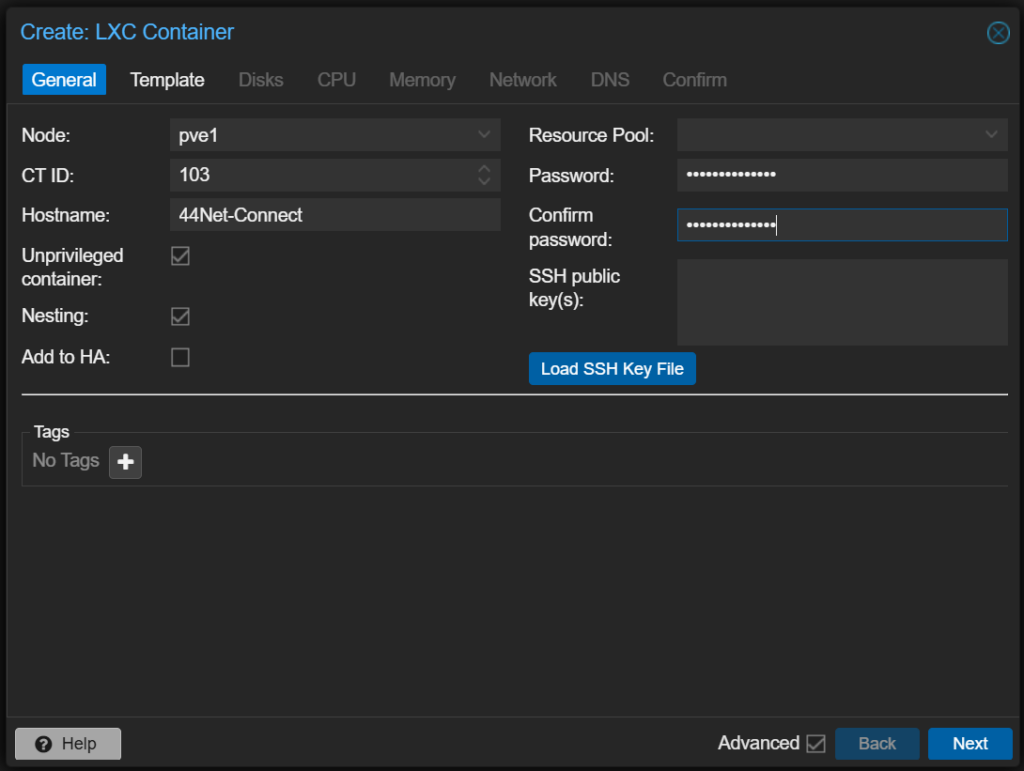
Choose a template for the LXC. I personally like Ubuntu Server, so I installed 24.04-2 LTS. This would need to be pre-downloaded to your Proxmox server before starting this process.
The rest of the specs are as follows:
- 1 core (if you’ll be serving light ham applications like a web server or AllStar node)
- 256 MB – 512 MB of RAM and equal swap
- 2 GB of disk space (my total system configured is only just over 512MB)
- Network
- eth0 with a bridged network of vmbr0, your regular default internet connection. Set a static IP, or use DHCP.
- Any public DNS server like 1.1.1.1 or 9.9.9.9
Confirm and hit Finish.
Start your new container, update it, then install some tools:
# apt update && apt upgrade -y
# apt install net-tools wireguard ufw resolvconf mtr
Copy your newly modified Wireguard config which includes your new subnet to the system:
# nano /etc/wireguard/44net-connect.confBring it up and perform testing just like earlier in the document:
# wg-quick up 44net-connect
# ping google.com
# mtr google.com
# systemctl enable wg-quick@44net-connect.service
# systemctl daemon-reload
Shut down the container, then add a network adapter to your LXC.
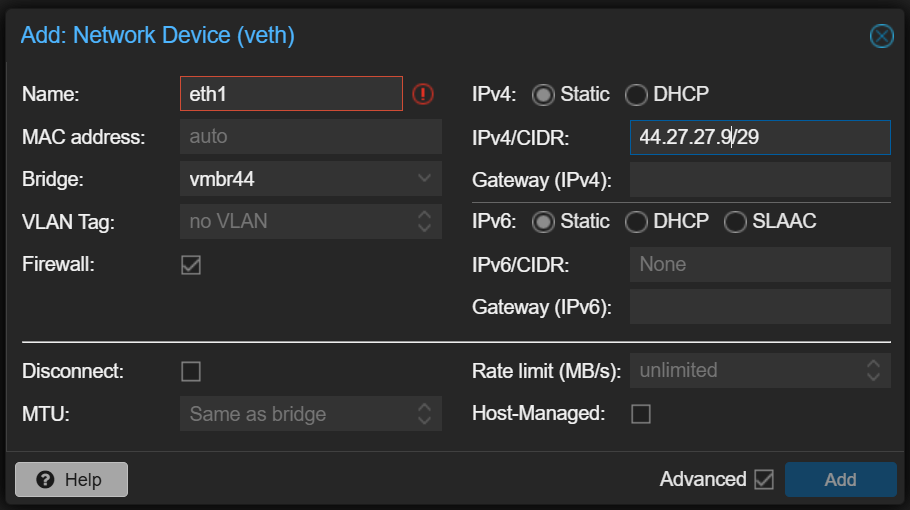
Name the interface “eth1”, select your 44Net bridge device you made earlier. In the IPv4 section, you’ll enter your 44Net allocation. In this case, we’ll use the first available IP address of the allocation and use that as our router address. So, if my allocation is 44.27.27.8/29, I would enter the first address of 44.27.27.9/29 in the IPv4/CIDR box. DO NOT ENTER A GATEWAY. Hit Add.
Start the LXC back up, and run a few commands to make sure the new adapter and address come up properly:
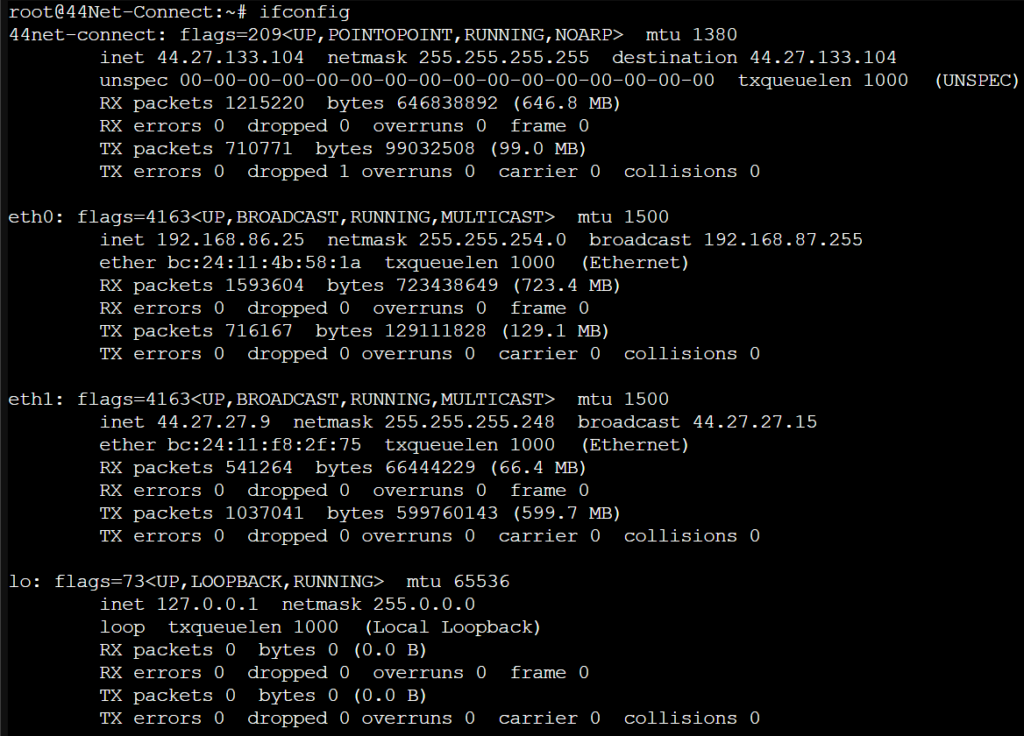
Now check the routing table. You should also see the new 44.x.x.x address there.

Enable routing in the Linux kernel and make it persistent:
# sysctl -w net.ipv4.ip_forward=1
# nano /etc/sysctl.d/99-sysctl.conf
Uncomment net.ipv4.ip_forward=1 in the file:

Save and exit.
Firewall it!
Here, you can choose to employ a basic firewall, or you can make this the primary place in which you block/permit network traffic from entering. I would recommend the latter.
# ufw enableAnd here’s a very basic set of rules. Replace the relevant IPs with your internal private network AND your 44Net allocation subnet. Again, this is beyond the scope of this document, but will get you going. Special thanks to Mark NI2O for this information:
# ufw route deny in on 44net-connect to 192.168.0.10/24 # Your IP/subnet on eth0 of the LXC
# ufw route deny in on eth1 to 192.168.0.10/24 # Your IP/subnet on eth0 of the LXC
# ufw route allow in on eth0 to 44.27.27.8/29 # Your IP/subnet of your 44Net allocation, as written on 44Net.cloud.  NOT your router IP.
# ufw route allow in on 44net-connect to 44.27.27.8/29 # Your IP/subnet of your 44Net allocation, as written on 44Net.cloud.  NOT your router IP.
# ufw route allow from 44.27.27.8/29 to any # Your IP/subnet of your 44Net allocation, as written on 44Net.cloud.  NOT your router IP.
The last command there is different from Mark’s documentation because his line didn’t work for me on the latest version of ufw supplied in Ubuntu 24.04. His documentation may well work perfectly on Debian 13.
And once again, study up on “ufw” and MAKE A BETTER FIREWALL! You’ll need to do this in order to allow services to pass onto your network.
You’re all done! To use your next available IP address after the router, simply use your 44Net bridge adapter “vmbr44” (or whatever you named it) when creating your new LXC or VMs instead of your regular 192.168.x.x internal network on “vmbr0”. Remember to use static IPs instead of DHCP. You could potentially configure a DHCP server on your router container as well, which will land outside the scope of this document, however if you’re using these addresses to provide public services, dynamic IPs are usually a hinderance to that process.
Troubleshooting
Slow connections, dropped packets, stalled downloads, etc…
The standard MTU of a network adapter in Proxmox is 1500, but the MTU of the Wireguard tunnel is 1380 by default. This creates a problem where packets sized at 1500 will not make it through the tunnel! In this guide when we created vmbr44, we changed the MTU to 1300, hopefully to avoid this issue, however, if your LXC or virtual machine still insists on trying to cram 1500 through a 1380 slot, things will not work correctly. Check the documentation for your operating system and make sure the MTU of your interface is set to 1300 or lower to fix the issue.
Here’s how you can test whether you’re being impacted by this:
# ping -s 1500 google.com # will probably fail
# ping -s 1300 google.com # will probably succeed
# ping -s 1350 google.com # try intermediate values to see how far you can push it
References
https://ni2o.ampr.org/documents/LXC%20container%20as%20a%2044Net%20VPN%20Subnet%20Router.pdf
https://ni2o.ampr.org/documents/LXC%20container%20as%20a%2044Net%20VPN%20Router_Firewall.pdf
https://blog.rtsp.us/ufw-uncomplicated-firewall-cheat-sheet-a9fe61933330
https://allstarlink.github.io/adv-topics/44net-connect
https://www.reddit.com/r/mikrotik/comments/1f0kpji/networking_in_linux_only_really_slow
https://superuser.com/questions/1771165/change-mtu-size-using-netsh-interface-ipv4-command